


Hey guys,
You may remember I had great plans at the start of the year to get better at doing make-up. The first 3 months of this year have just been so busy with work, travel and everything else that once again my make-up skills kind of fell to the bottom of the pile. Two weeks ago I decided it’s time to stick to my word and I got together with Emma Farrell from EF Creative Studios for a little make-up lesson. She is amazing – check out her website. There really is no one better to learn from!
I thought I would start with something very simple but effective – Contouring. I know there are probably a million and one contouring tutorials out there but I’ve made it very easy to follow with only 3 steps (for those of you who, like me, don’t know where to start). The idea behind contouring is to highlight the parts of your face you want to pull towards you and contour the parts you want to push away.
These kinds of blog posts are totally out of my comfort zone as my make-up skills are definitely not something I would be confident about. But hey…
If it doesn’t challenge you, it won’t change you.
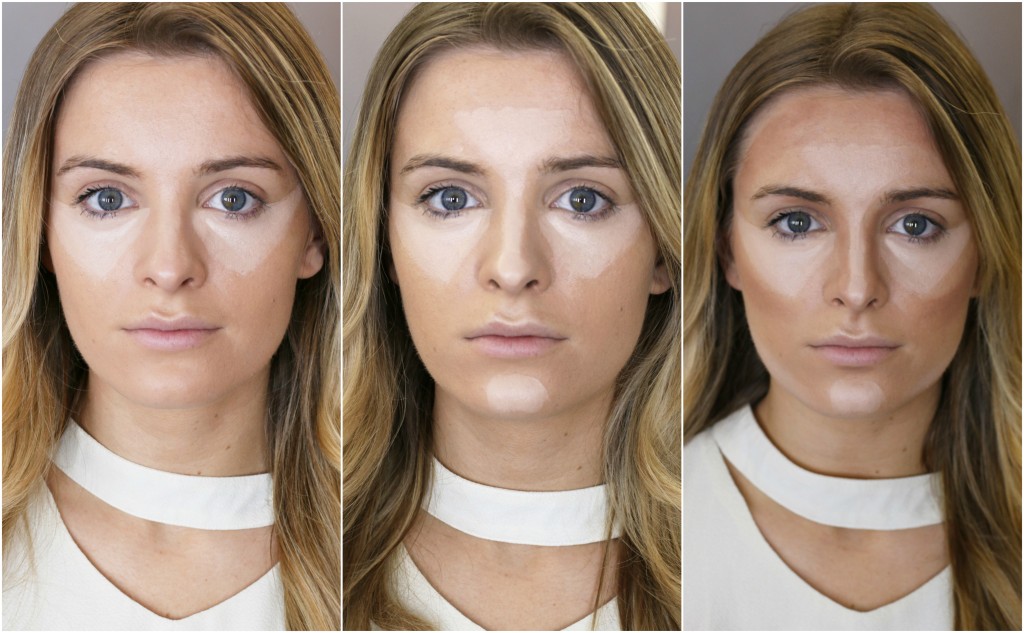
Step 1:
Before you get started on contouring I would suggest applying your usual moisturiser, primer, concealer and foundation. You’ll find it will be easier to blend the highlighter and contour with this as a base. Here we used L’Oreal Infallible Sculpt Foundation which takes to contouring really well. We also used the L’Oreal Infallible Sculpt Contour Set in ‘Light’ which is a gel that sets as a powder. Priced at less than €10 it has to be the best value contouring set on the market.
The first step is to highlight the areas you want to accentuate. Everyone’s face has a different shape and everyone will want to contour their face a little differently. The usual areas for highlighting are: on top of the cheekbone, under eyebrows, forehead between eyebrows and moving upwards, nose, upper lip (cupids bow) and chin.
Step 2:
The second step involves the fun part – contouring. Using the darker shade of the contour set trace the temples of your face. You can use contouring to minimise your forehead by drawing a dotted line around the hairline and blending. To accentuate your cheekbones find the hollow part where your face dips over your cheekbone – and apply the contouring gel right above this dip. For the nose, you can make it narrow by contouring at the tip, or you can continue up to your eyebrows to lengthen. It all depends on what you like – so play around with it. And don’t forget to blend – you don’t want to end up looking like you are wearing facepaint (like me above on the right!)
Step 3:
The third step involved adding blush to the cheekbones and lots of blending. We used a L’Oreal Sculpting Brush to blend, you can purchase here. Baring in mind I have’t eye or lip make up in the images – this would really finish off the look. I am excited to incorporate these three steps into my daily make-up routine.

See the video below for some behind the scenes shots of my make-up lesson with Emma.
Let me know if you try it out or if you have any other tips for me I’d love to hear them – just drop me an email here,
Have a great week,
Louise x